As is well known, unRAID, as one of the most popular home NAS systems, does not provide remote disaster recovery capabilities (the last item in the 3-2-1 backup principle). As data in the NAS becomes more and more abundant and applications become increasingly complex, I am increasingly concerned about how to recover if all NAS hardware fails due to force majeure (earthquakes, floods, fires, theft, etc.). In order to ensure that data is absolutely safe, today let’s talk about remote disaster recovery.
Today we’re taking about RClone :
Rclone is a command-line program to manage files on cloud storage. It is a feature-rich alternative to cloud vendors’ web storage interfaces. Over 70 cloud storage products support rclone including S3 object stores, business & consumer file storage services, as well as standard transfer protocols.
In simple terms, RClone is a command-line tool for syncing online drives. It supports over 40 types of online drives. Today I will introduce the simple configuration of commonly seen domestic Alibaba Cloud Drive and OSS.
Installing RClone
Side note: The first time I installed it, I used the Docker version with a built-in GUI. However, after exploring the GUI for a while, I couldn’t find the sync feature I was looking for. At the same time, as I was reading the official documentation, I gradually realized that this is a command-line tool. So, I switched to the unRAID plugin version because what I needed was almost a complete backup of all data on my Nas. It seemed unnecessary to open all directories to Docker containers if that were the case.
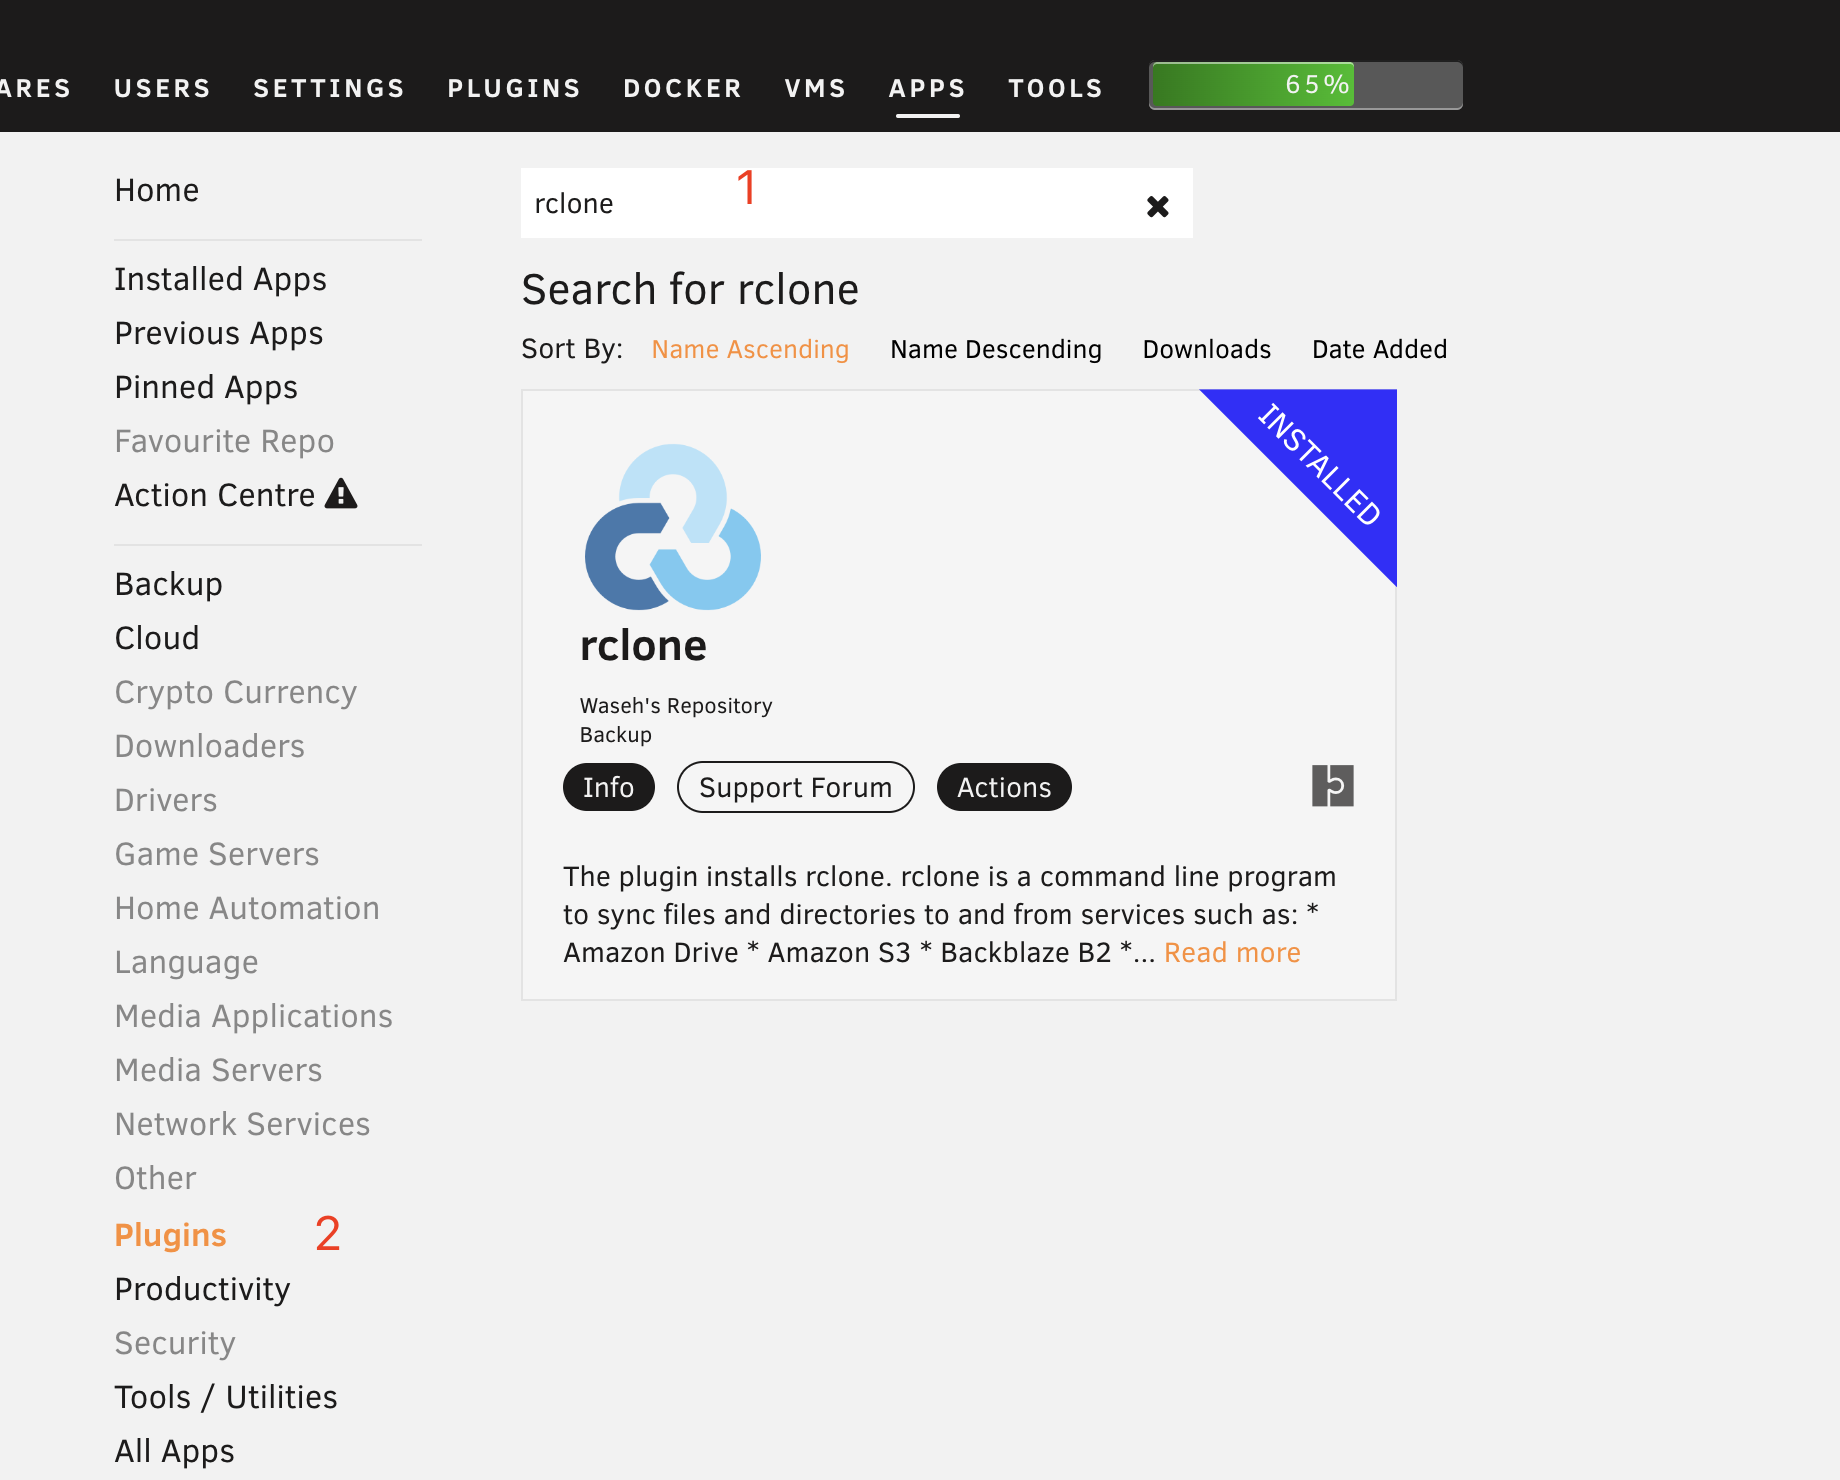
In the unRAID backend’s APPS tab, search for rclone and then click on Plugins on the left side to filter out plugin versions. Click Actions to install:
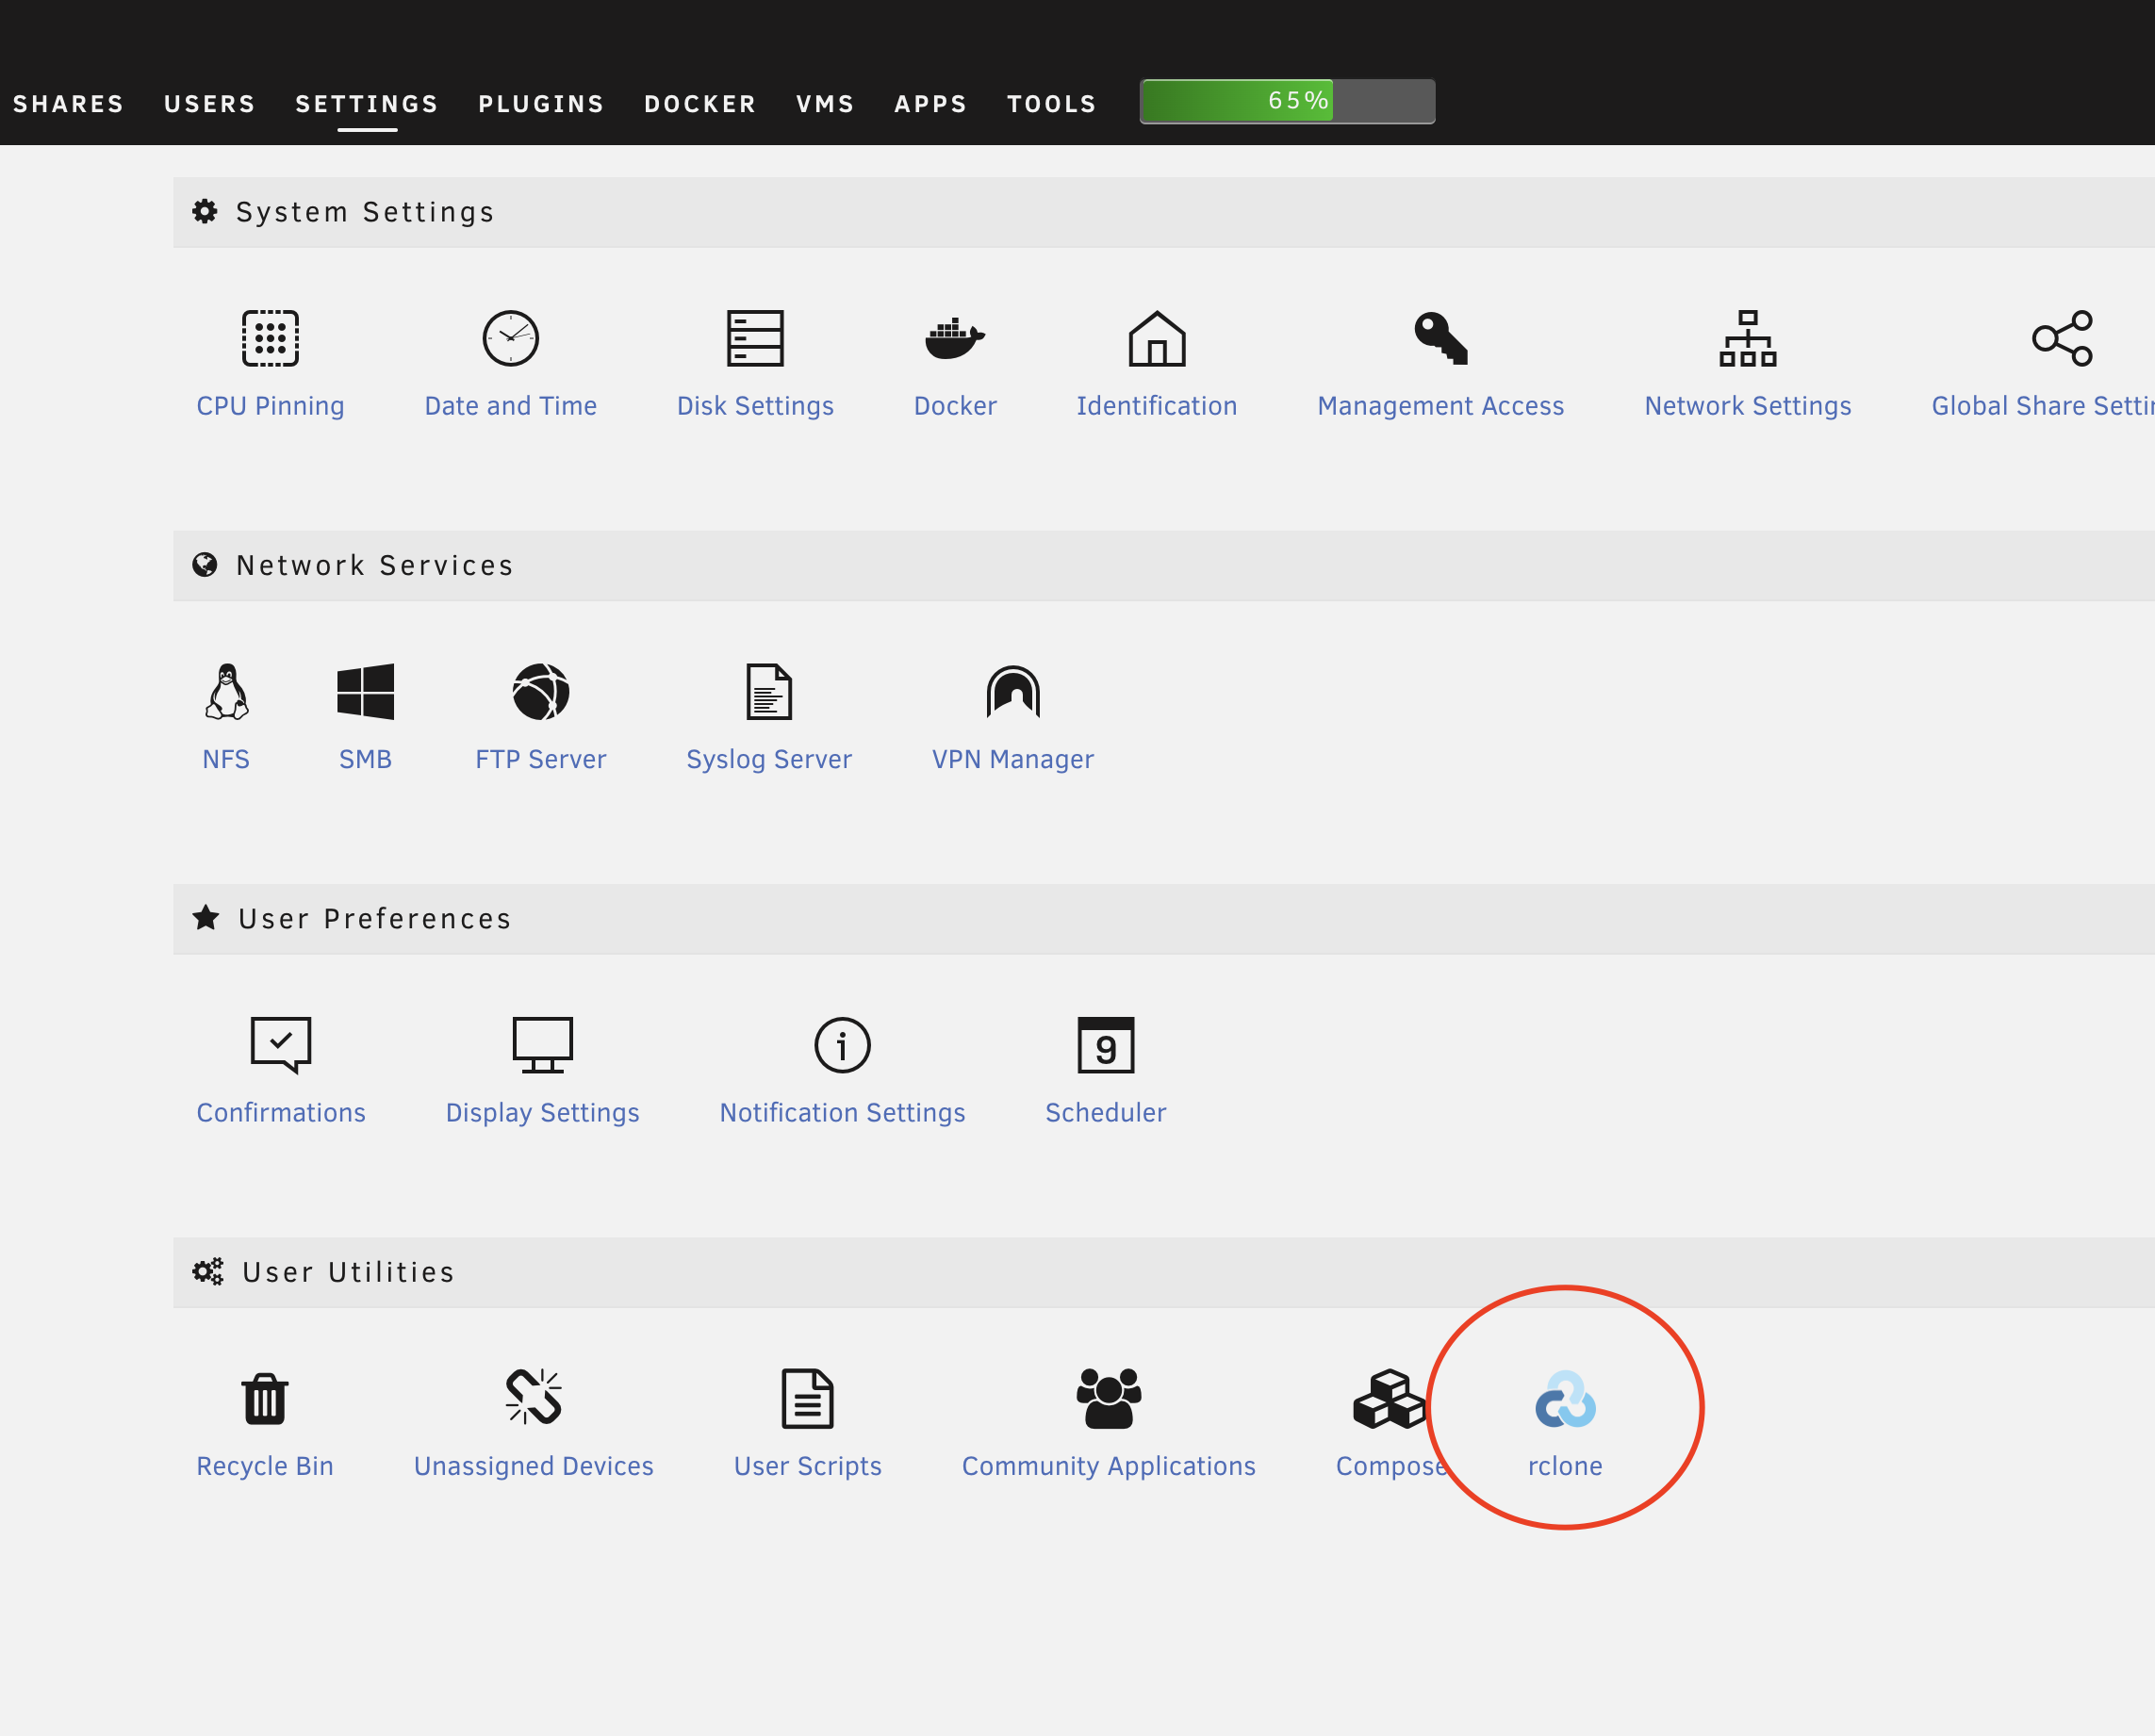
After installation is completed, run the command rclone version to confirm whether it has been successfully installed or go to Settings > User Utilities > rclone panel and check:
Configuration
A faster way to configure is to go directly to Settings > User Utilities > rclone, paste the configuration into the configuration file, and refer to the content of the configuration file below.
Using command line for configuration provides finer granularity, which is also a method provided in the official documentation: executing rclone config will pop up an interactive terminal session. According to the prompts, enter “n” to create a new configuration, and then follow the prompts to input further details.
OSS
OSS configuration is very simple. For comparison with cloud storage, please refer to the official website. I believe it is more suitable for backup than cloud storage.
Configuration file content:
[oss]
type = s3
provider = Alibaba
access_key_id = xxx
secret_access_key = xxx
endpoint = oss-cn-hangzhou.aliyuncs.com
acl = private
Configurate it with tips:
# Remote connection name
name> oss
# Storage type, either by entering the corresponding numeric number or by entering the known type directly
Storage> s3
provider>Alibaba
# Authentication, select false or just enter to skip it
env_auth>
# Next up is the familiar AK field
access_key_id>xxx
secret_access_key>xxx
endpoint>oss-cn-hangzhou.aliyuncs.com
# You don't need to fill it out, just leave the permissions to AliCloud.
acl>
# The stuff behind isn't important, just press enter all the way.
storage_class>
The next step is to execute rclone config and you will be able to see the remote connection that was just configured.
Current remotes:
Name                 Type
====                 ====
oss                  s3
The command rclone lsd oss: is used to test the connection.
The meaning of
lsdis to list directories, andoss:is in the format ofremote connection name: path, with an empty path indicating the root directory.
-1 2022-08-07 11:36:13 -1 unraid # This is the name of the bucket, you need to create it yourself
A brief demonstration:
# Copy local /mnt/user/Public to remote /unraid/Public, existing files will be skipped.
rclone copy /mnt/user/Public remote:/unraid/Public

# Move the local /mnt/user/file to the remote /unraid/ directory.
rclone move /mnt/user/file remote:/unraid/file

# Make remote /unraid/Public consistent with local /mnt/user/Public and will not modify local files
rclone sync /mnt/user/Public remote:/unraid/Public
The important thing to note is that there are two synchronization commands:
sync is a one-way sync, it only modifies the destination and does not modify the source directory.
- If you delete a file locally, the corresponding remote file will also be deleted (if you don’t want this, you can use the copy command).
- If a remote file is deleted, as long as the local file still exists, rclone sync will push this file back to the remote again.
bisync is what intuitively seems like bidirectional synchronization. Not currently in use. For more details, please refer to the official documentation.
Aliyun Drive
Aliyun Drive does not have direct support, but is supported through the implementation of one of the standard protocols mentioned earlier, WebDAV.
I use messense/aliyundrive-webdav, and you can also use openlist, which supports more domestic cloud drives.
I won’t go into detail about using Docker images in this process. However, I encountered a pitfall:
Previously, I had configured all my Docker container networks as br0, allocating an IP rather than a host (unRAID) port. However, the container’s IP cannot be accessed on unRAID and needs to be set in Settings > Docker or changed to Bridge for port allocation. Outdated
After successful setup, append the following content to the configuration file:
[adrive]
type = webdav
url = http://localhost:8080
vendor = owncloud
user = xxx
pass = xxx
After the operation is completed, you can obtain a remote connection equivalent to that of OSS, with exactly the same commands.
Automatic Synchronization
Install User Scripts
I achieved scheduled tasks through the User Scripts plugin, which can be found by searching in the APPS panel. You can also use the system’s built-in crontab.
Add a task
cd /boot/config/plugins/user.scripts/scripts
Create a directory (it’s more convenient to directly copy other tasks), create a file named “script” without any extension, and write the following content:
#!/bin/bash

cd /mnt/user

echo "syning Public"
rclone sync /mnt/user/Public oss:/unraid/Public --exclude-from=/boot/config/plugins/user.scripts/scripts/rcloneignore --progress
rclone --no-update-modtime sync /mnt/user/Public adrive:/unraid/Public --exclude-from=/boot/config/plugins/user.scripts/scripts/rcloneignore --progress
The contents of my rcloneignore file:
*DS_Store
.AppleDB/**
.Recycle.Bin/**
$RECYCLE.BIN/**
.Trash/**
lost+found/**
tmp/**
temp/**
node_modules/**
cache/**
caches/**
.cache/**
.caches/**
*.log
.pnpm-store/**
Set up task scheduling
Then just go to Settings > User Utilities > User Scripts to set up task scheduling.

By the way, I’d like to share a script with a compressed and dated version.
#!/bin/bash
cd /mnt/user/appdata

TODAY=`date +'%Y%m%d'`
NAME=appdata_$TODAY.tgz
LOCAL_DIR=/mnt/user/Downloads/tmp
LOCAL_PATH=$LOCAL_DIR/$NAME
REMOTE_DIR=/unraid

mkdir -p $LOCAL_DIR

# Note: It is not feasible to back up a running complex database (MySQL, PostgreSQL, SQLite) through direct file operations, it will not be recoverable 100%.
# First, the database needs to be stopped before backing up the files to be effective. Or use the specialized backup tools provided by the database system, and perform the backup operation through a standard client connection.
tar\
   --exclude-from="/boot/config/plugins/user.scripts/scripts/tar_exclude"\
   --exclude-caches\
   --exclude-backups\
   --exclude-vcs\
   --exclude-vcs-ignores\
   -czvf $LOCAL_PATH .

echo "uploading to $REMOTE_DIR"
rclone copy $LOCAL_PATH oss:$REMOTE_DIR --progress

echo "Cleaning up old backups older than 60 days..."
rclone delete oss:$REMOTE_DIR --include="appdata_*" --min-age 60d --progress
Backup flash
flash backup is also very simple, just compress the /boot directory:
tar -czvf /tmp/`hostname`_flash.tgz --exclude 'previous*' --exclude "System Volume Information" --exclude 'logs*' /boot
Encrypted backup
Why?
All Chinese cloud storage services (including OSS) have privacy and censorship issues. Cloud storage will erase location information in photo EXIF data, and there is a risk of deletion (whether you share publicly or not, all content must undergo censorship).
Hands on
# Add a new remote storage. Enter a name (take `secret` as an example)
name> secret
# Select 'crypt' as the type
Storage> crypt
# Select an existing remote and path as the root directory of the new remote
remote> oss:/mybackup
# How to encrypt the filenames. (The default value standard has a filename length limit, obfuscate is recommended)
filename_encryption> obfuscate
# Option to either encrypt directory names or leave them intact.
directory_name_encryption> true
# Password or pass phrase for encryption.
Enter the password:
password:
Confirm the password:
password:
# Password or pass phrase for salt. Optional but recommended. Should be different to the previous password.
# I generated it randomly, just save the configuration and paste it when you need it
y/g/n> g
The usage of the new remote is the same as other remotes:
# Encrypted backup to `oss:/mybackup/Photos`
rclone sync /mnt/user/Photos secret:/Photos

# If you view the file directly, you will find that the file name has been obfuscated and you cannot directly read the content of the file by downloading it directly.
rclone lsf --max-depth 1 oss:/mybackup/Photos

# View/download real directories and files through `secret:`
rclone lsd secret:/Photos
rclone copy secret:/Photos ~/MyPhotos
Once set up for the first time, you can freely paste and modify the configuration file thereafter:
[secret]
type = crypt
remote = openlist:/adrive/backup
password = *** ENCRYPTED ***
password2 = *** ENCRYPTED ***
Disadvantages of this solution
- It will generate a large number of OSS requests, resulting in additional fees.
- No version history
- No compression
- No deduplication
For further optimization see this article。