iOS(iPhone/iPad)
The steps are as follows:
Creating a “Shortcut”
You can modify it based on the shortcut command I shared:
You can also add it manually by following the steps below:
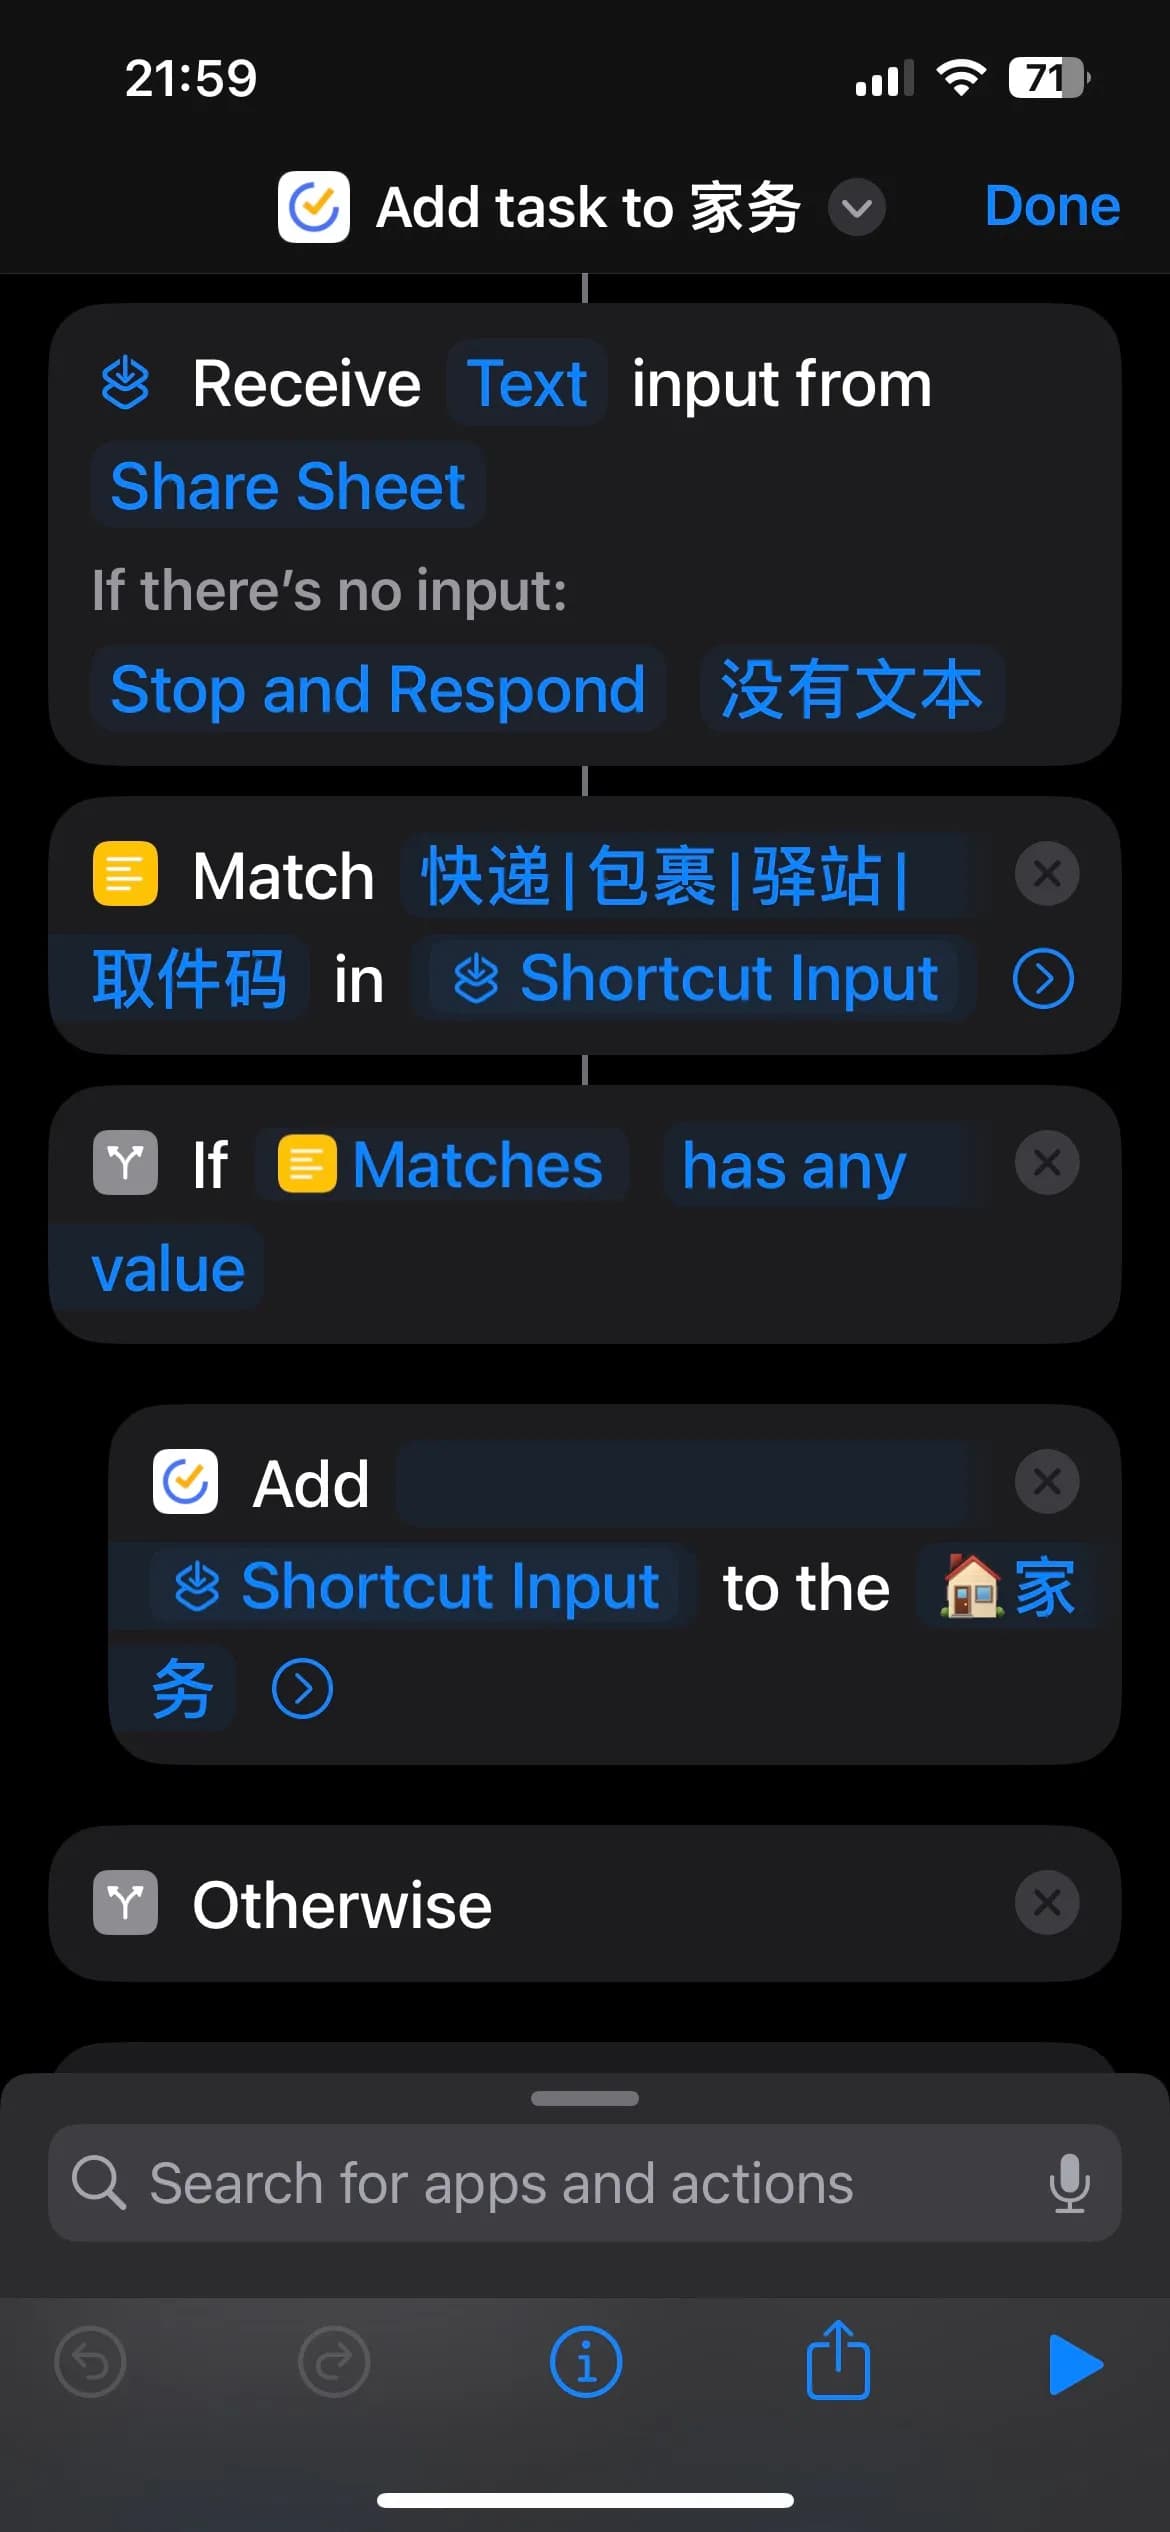
Add Action
- Open the “Shortcuts” app and tap the ”+” in the upper right corner.
- Click “Add Action”.
- Find “Match Text” in the pop-up window (under the “Documents” category, in yellow)
- Rename this shortcut to “Add task to xxx list”
Add a Parameter
- Click on the exclamation point at the bottom
- Enable “Show in Share Sheet”
- Click “Done”
Modify the parameter type
- An additional card will appear, click on “Images and 18 more”.
- Click on “Clear” in the upper left corner (to quickly diable all options)
- Find “Text” in the options below and turn it on.
- Click “DOne”.
Set Boundary Conditions
”If there’s no input”:
“Stop and Respond”: “No content”
Set up the content matching rule
Change Match [0-9a-zA-Z] in "text" to Match "快递|包裹|驿站|取件码" in "Shortcut Input".
Where “Shortcut Input” is a magic variable, the following text is a regular expression pattern, ”|” means “or”. I tried “\d-\d-\d{4}” and it didn’t work. I don’t know why.
Determine the match result
If "Matchs" "has any value",Add "Shortcut Input" to the "XX List"
Create new “Automation”
Automation: Run Immediately
When I get a message containing "【"
Do Add task to xxx List(the shortcut you just created)

Android
Install SmsForwarder
The installation process will not be repeated.
Add a “Sender”
- Open the SmsForwarder App.
- Switch to “Sender” in the bottom navigation bar.
- Click on the ”+” in the upper right corner.
- Choose the type of the “Sender” you want. Taking TickTick as an example, select Webhook (URL Scheme should also work, but I haven’t tried it on an Android device because I don’t have TickTick installed).
- Fill in the information as below:
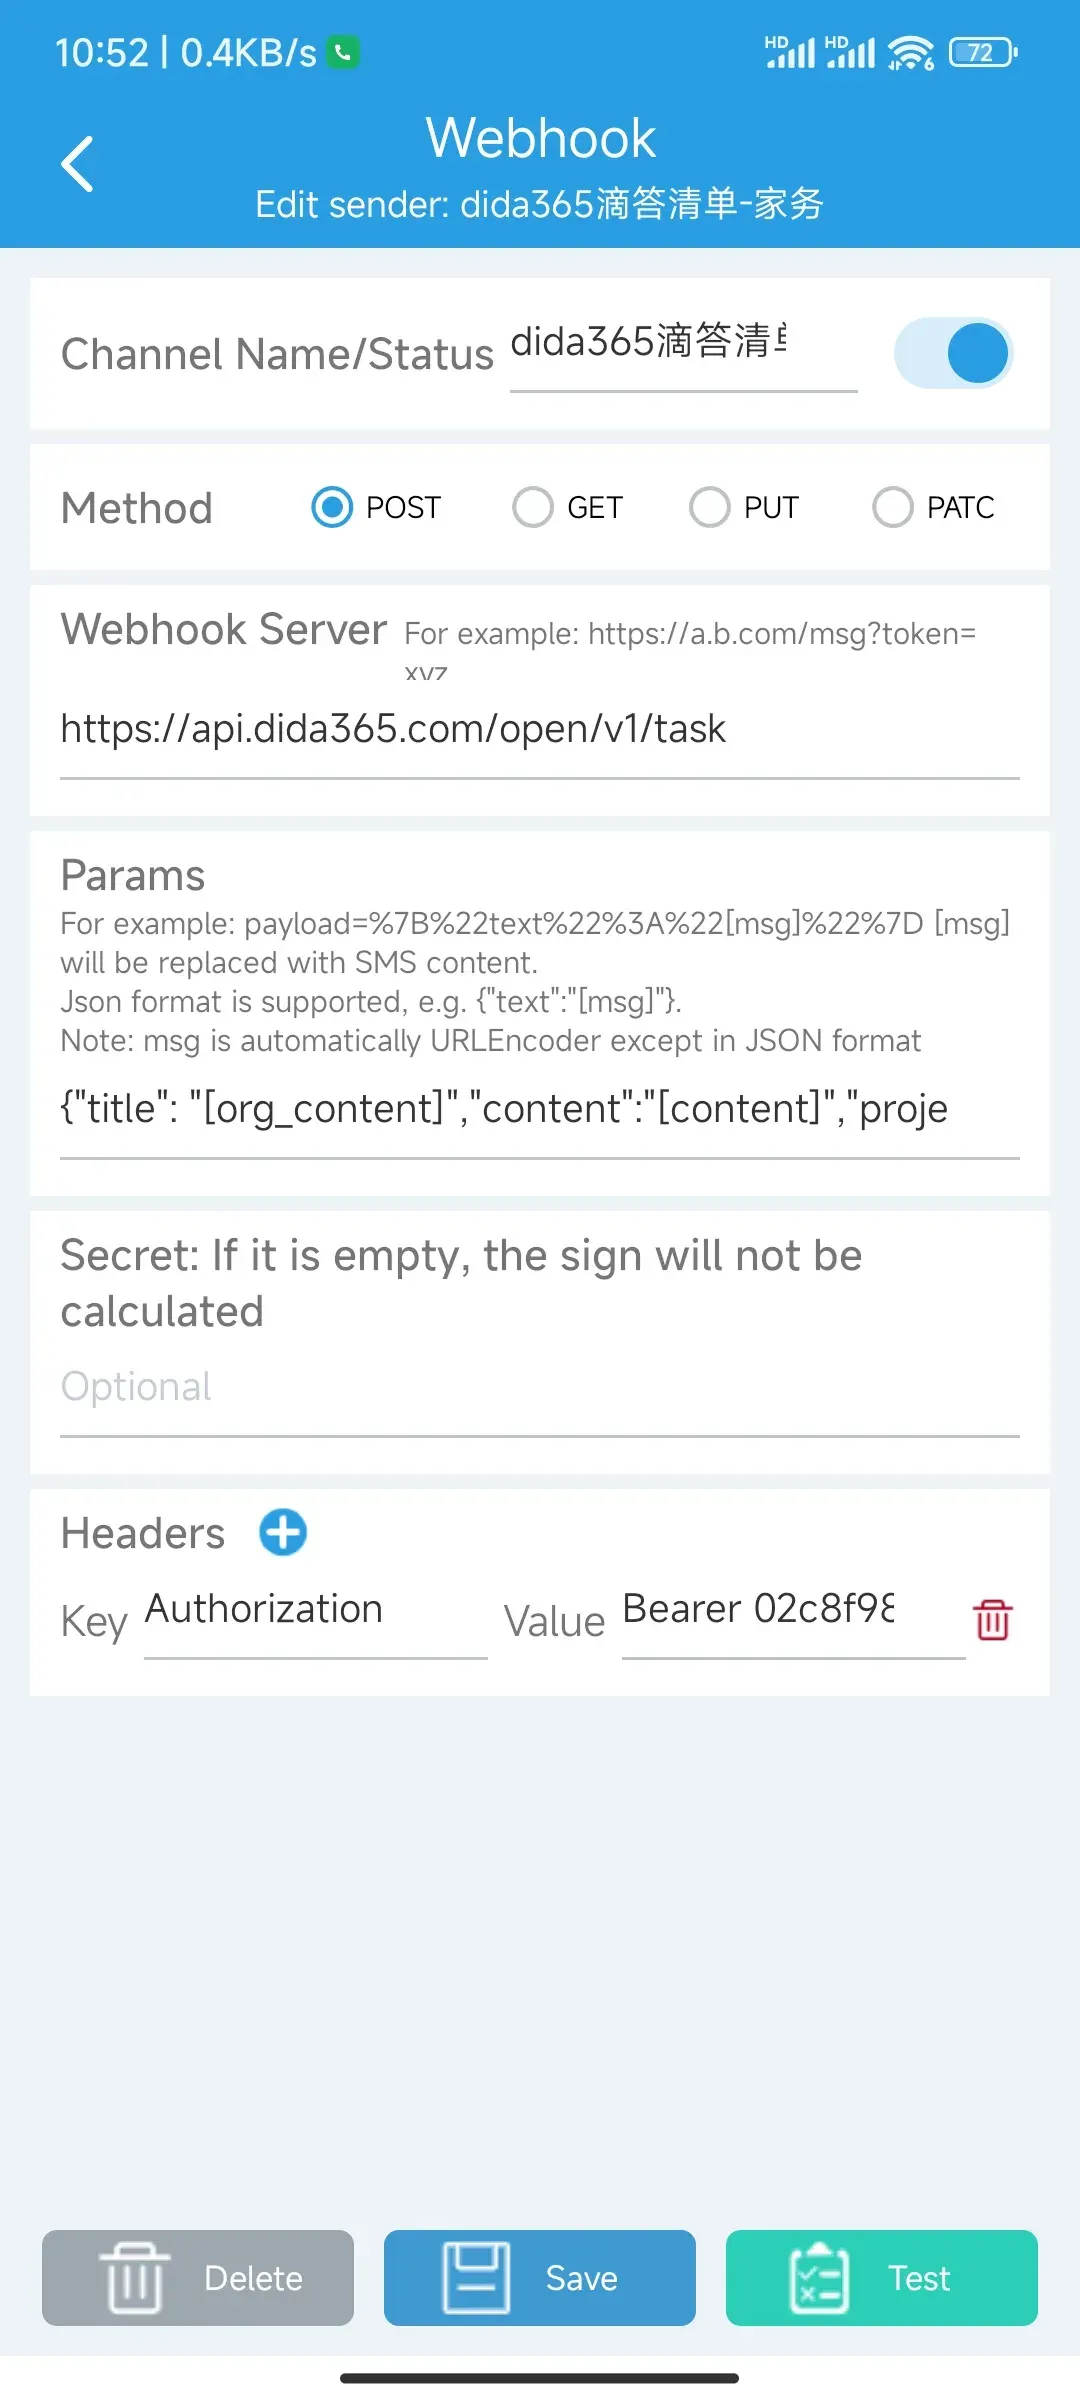
The resources involved in Fig:
- TickTick create-task API and the Parameter Templates:
{ "title": "[org_content]", "content": "[content]", "projectId": "xxx", "startDate": "[receive_time:yyyy-MM-dd'T'HH:mm:ssZ]" } - Steps to get a TickTick Access Token and Simple codes:
const Koa = require("koa");

const Router = require("@koa/router");

const { PORT = 4001 } = process.env;
const client_id = "xxx";
const client_secret = "xxx";
const scope = "tasks:write";
const redirect_uri = `http://localhost:${PORT}/redirect`;

const app = new Koa();
const router = new Router();

router.get("/", async (ctx, next) => {
  await next();

  ctx.body = `<a href="https://dida365.com/oauth/authorize?scope=tasks:write&client_id=${client_id}&state=state&redirect_uri=${encodeURIComponent(
    redirect_uri
  )}&response_type=code">Click to Login</a>`;
  ctx.response.status = 200;
});

router.get("/redirect", async (ctx, next) => {
  await next();
  let code = ctx.query.code;
  let buff = Buffer.from(`${client_id}:${client_secret}`);
  let base64data = buff.toString("base64");
  const response = await fetch("https://dida365.com/oauth/token", {
    method: "POST",
    headers: {
      Authorization: `Basic ${base64data}`,
      "Content-Type": `application/x-www-form-urlencoded`,
    },
    body: Object.entries({
      code,
      grant_type: "authorization_code",
      scope,
      redirect_uri,
    })
      .map(([key, value]) => {
        return encodeURIComponent(key) + "=" + encodeURIComponent(value);
      })
      .join("&"),
  });
  const data = await response.text();
  ctx.body = data;
  ctx.response.status = response.status;
});

app.use(router.routes()).use(router.allowedMethods()).listen(PORT);
console.log(`listened http://localhost:${PORT}`);
Add a forwarding rule
- Open the App
- Switch to “Rules” in the bottom navigation bar.
- Switch to “Sms” in the top navigation bar.
- Click on the ”+” in the upper right corner.
- Fill in the information as below:

Please check the official documentation for other configuration items.
If you find this article helpful, please give it a like below or support it with a Star.